Imagine a case full of all the important data required to optimally run your shop floor. This case is your SQL (Structured Query Language) Database.
Your SQL database contains many important pieces of data to ensure a steady work flow. Anything from your material lists, to your Quotes and any information regarding your customers is stored in the database. All this data is stored in a table format access by SigmaNEST to process and complete the job. Seeing that this data is of utmost importance, it is wise to do regular backups. This may be done using one of two methods:
• Manual Backup through SQL server management studio (SSMS).
• Automatic backup using SSMS and windows task scheduler.
The first step to either of these methods is to install SQL server management studio, these install files can be found with your SigmaNEST install files in the folder “SQLManager_2014”. To start the install, run the file “SETUP.EXE”, the window below will open.
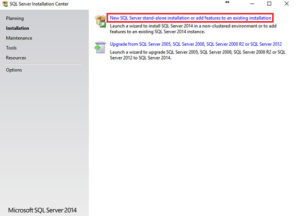
Select the text boxed in the red box above to add to the existing install. The install will then run through various checks, once this is complete you will see a window with the heading installation type. Here, select “Add features to an existing instance of SQL Server 2014” and select your SigmaNEST instance from the dropdown list. Once the database is selected, click next in the bottom right corner. Accept the license terms and click next. The following window will appear:
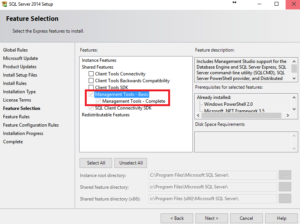
Tick the two boxes shown in the image above and click next. The install of SQL Server management studio will then start, this may take a while depending on the PC and the size of the database. Once the install is finished, a window will appear with the heading “Complete”. You may now click close on the bottom right of the window. Once this is installed you can back up your database using one of the methods below. Manual Backup:
1. Launch SQL Server Management Studio, this is done by finding the icon in the windows start menu.
2. A window will appear asking you to connect to the server (as seen below):
Click the dropdown menu next to “Server name” and select the SQL instance you need to backup. Using the login “sa” and the password “Shark1445NE$T” will grant you administrative access and allow you to proceed with the backup.
3. This will open the windows explorer view on the left. In this view you can view the database and change login details and roles. Expand the Databases tab by clicking the plus sign on the left.
4. This will drop down “System Databases” and “SNDBase”, we will only be interested in “SNDBase”
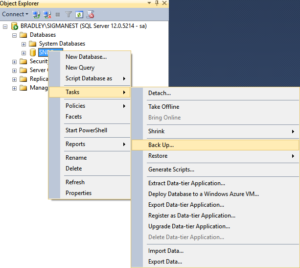
5. Right click on SNDBase, highlight Tasks. This will expand further on the right and click on backup, as seen in the image above.
6. This will open the backup settings window, seen below:
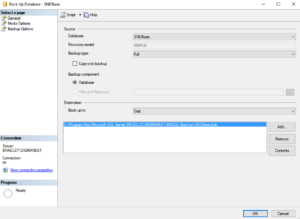
7. The settings above will be the default settings for your database, it is recommended to do a full backup. To change the location where the backup is saved, click the “Add” button on the right-hand side and select the required path.
8. Select the “Media Options” button on the left-hand side. The window below will appear.
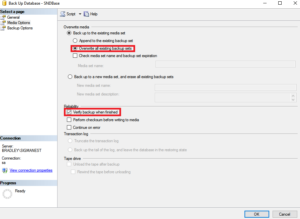
9. Ensure that the correct options are selected, then click “OK” in the bottom right.
10. The data will start to backup and the progress can be seen in the bottom left hand corner. Once the backup is complete, close the software. Scheduled Backup A scheduled backup will allow you to set certain days and times when your database will be backed up in the background. To set this up, follow the steps below:
1. Create a script using Note pad named “SNSQLBackup.sql” and save it in a safe location. This script should say the following:

Where “database name” is the name of the database and “fullpathtobackup” is the path of where you require the backup to be saved.
For example:

2. Open task scheduler in the start menu and create a basic task.
3. Create a suitable name for the task, then click next. For example: SigmaNEST Database Backup
4. Select when you would like the task to occur, should it be daily, weekly or even monthly then click Next.
5. Select that the task should start a program, then click Next.
6. In the Program/Script box, click Browse and locate SQLCMD.EXE, Usually found in “C:\Program Files\Microsoft SQL Server\Client SDK\ODBC\110\Tools\Binn\SQLCMD.EXE”.
7. Add an argument, (-S LOCALHOST\SQLEXPRESS –i ”FullPathToScript.sql”). Where LOCALHOST\SQLEXPRESS is your SeverName\SIGMANEST and “FullPathToScript.sql” is the location where the script file is saved.
For Example:
-S LOCALHOST\SigmaNEST -i “c:\Databasebackups\SNSQLBackup.sql”
8. Click Next and review the Summary, then click finish.
9. Manually run the task to test that it will work correctly.
Losing your SigmaNEST SQL database is catastrophic as losing this would mean losing any open quotes or orders. It can therefore be seen that taking a few minutes a day to manually backup your database or to schedule a recurring backup is truly worth it. Should you require any assistance on this topic please do not hesitate to contact the SigmaNEST Support team.
]]>