SigmaNEST Installation Guide
Use the following steps to install SigmaNEST on one or more systems.
Note: If you are upgrading an existing version of SigmaNEST, follow the instructions in the section on
Upgrade Installation first, then return to this section when prompted.
- Log into a Windows account with Admin rights.
- From the SigmaNEST installation package that you downloaded, run Startup.exe. The SigmaTEK installer window opens.
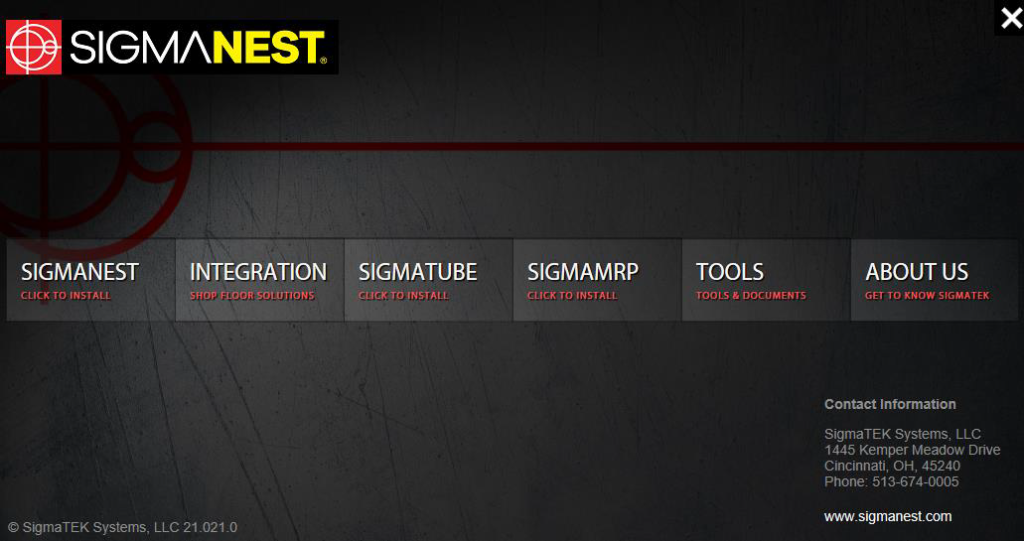
- Click SigmaNEST.
- Select your language from the drop-down menu, then click OK to start the InstallAware Wizard.
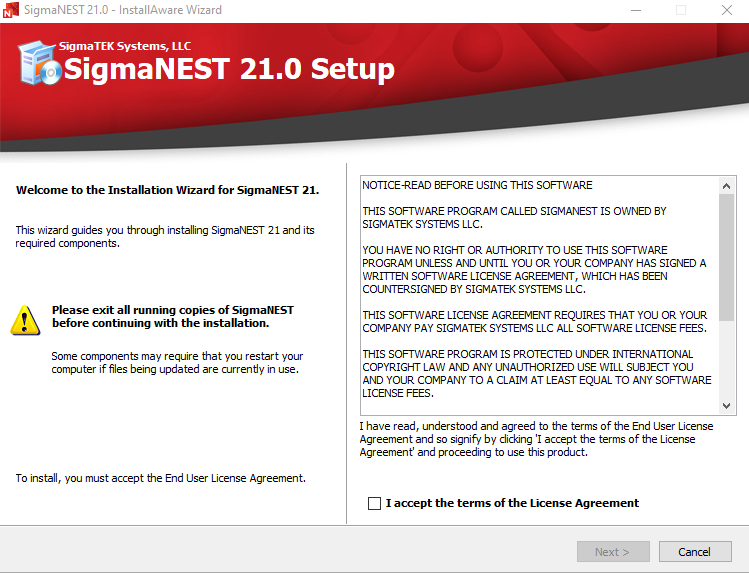
- Read the terms, select I accept the terms of the License Agreement, and then click Next.
- Enter a Start Menu Group, then click Next.
- Select Install SigmaNEST program files, enter an installation path, then click Next.
- If you do not have an instance of Microsoft SQL Server 2014 (64-bit) or higher, and you plan to host the SQL database on this computer, select Install Microsoft SQL Server on this computer.
- If you plan to host the SQL database on this computer, also select Create a new SigmaNEST database or upgrade an existing database.
Note: See Database/SNData Installation (page 30) for information on installing the SQL server and database on a separate system without SigmaNEST. - Click Next.
- If you want to install the SNData folder on this system, select Create or upgrade the SNData folder structure, enter an installation path, and then click Next.
Note: See Database/SNData Installation (page 30) for information on installing the SNdata folder on a separate system without SigmaNEST. - Enter the connection information for your license server, and click Next.
Note: If you are unsure about the licensing connection information, you can skip this step, however, you will then need to provide it later to start SigmaNEST. - If you have an existing SigmaNEST or SimTrans installation running on this computer, select Stop SigmaNEST and SimTrans processes for me and click Next.
- Click Next to begin the installation. This may take several minutes.
- If a previous version of SigmaNEST is installed on the computer, the Install-Upgrade will open. Click Next
to import your old settings to the new installation, or click Close to skip the import and use the default settings. If you are unsure about this option, click Close. You can always move old settings over to the new installation at a later time. Also, some old settings can interfere with the operation of a much newer version of SigmaNEST.
16. If you chose to create or upgrade an SQL database in step 9, the Database Installer will open. Select the SQL Server that will host the database, and enter your login credentials.
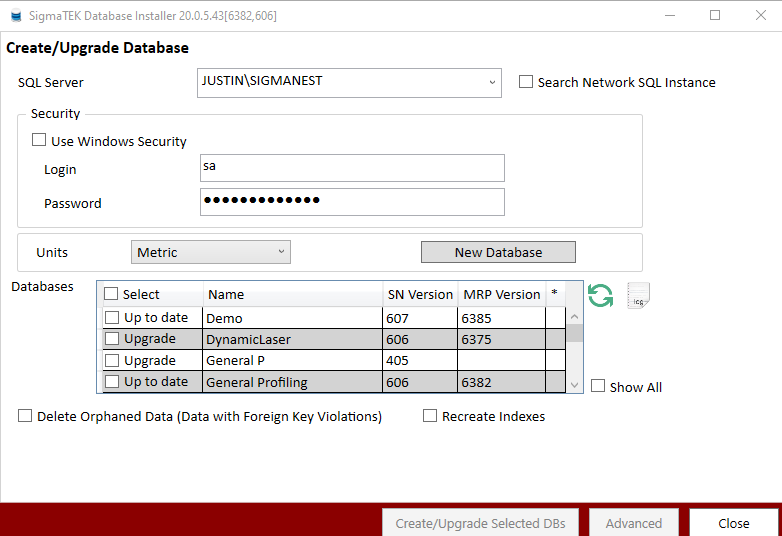
- If you are creating a new database, choose whether the default database units will be Imperial or Metric, then click New Database. Enter the database name and click OK.
If you are upgrading an existing database, select it from the list. - Click Create/Upgrade Selected DBs.
- After the database has been created (or upgraded), click Close.
- Click Finish to complete the installation.
Custom Installation
A custom installation allows you to select which SigmaNEST components to install. Custom installations are typically used in large environments with multiple servers and computers.
- Log into a Windows account with Admin rights.
- From the SigmaNEST installation package that you downloaded, run Startup.exe. The SigmaTEK installer window opens.

- Click SigmaNEST.
- Select your language from the drop-down menu, then click OK to start the InstallAware Wizard.

- Read the terms, select I accept the terms of the License Agreement, and then click Next.
- Select Custom Install in the lower-left corner of the dialog box.
- Enter a Start Menu Group, then click Next.
- If you want to install SigmaNEST, select Install SigmaNEST program files, enter an installation path, and then click Next.
- If you do not have an instance of Microsoft SQL Server 2014 (64-bit) or higher, and you plan to host the SQL database on this computer, select Install Microsoft SQL Server on this computer.
- If you plan to host the SQL database on this computer, also select
Create a new SigmaNEST database or Upgrade an existing database.
Note: See Database/SNData Installation (page 30) for information on installing the SQL server and database on a separate system without SigmaNEST. - Click Next.
- If you want to install the SNData folder on this system, select Create or upgrade the Folder structure, enter an installation path, and then click Next.
Note: See Database/SNData Installation (page 30) for information on installing the SNdata folder on a separate system without SigmaNEST. - Enter the connection information for your license server, and click Next.
Note: If you are unsure about the licensing connection information, you can skip this step, however, you will then need to provide it later to start SigmaNEST. - Select features you want to install from the list on the left. A description is displayed in the Feature description box on the right. The disk space requirements in the box below change based on your selection.
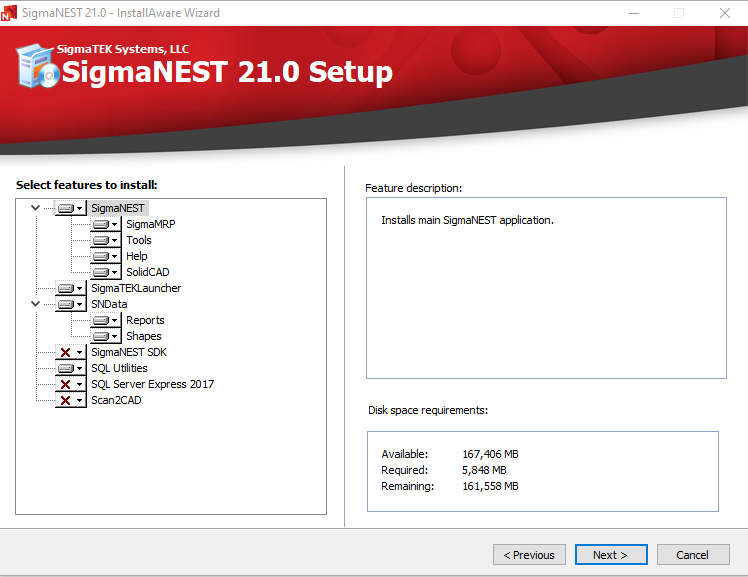
15. Click Next to begin the installation. This step may take several minutes.

- If a previous version of SigmaNEST is installed on the computer, the Install-Upgrade will open. Click Next
to import your old settings to the new installation, or click Close to skip the import and use the default settings. - If you chose to create or upgrade an SQL database, the Database Installer will open. Select the
SQL Server that will host the database, and enter your login credentials. - If you are creating a new database, choose whether the default database units will be Imperial or Metric, then click New Database. Enter the database name and click OK.
- If you are upgrading an existing database, select it from the list.
- Click Create/Upgrade Selected DBs.
- After the database has been created (or upgraded), click Close.
- Click Finish to complete the installation.